1、redux的理解
redux的工作原理
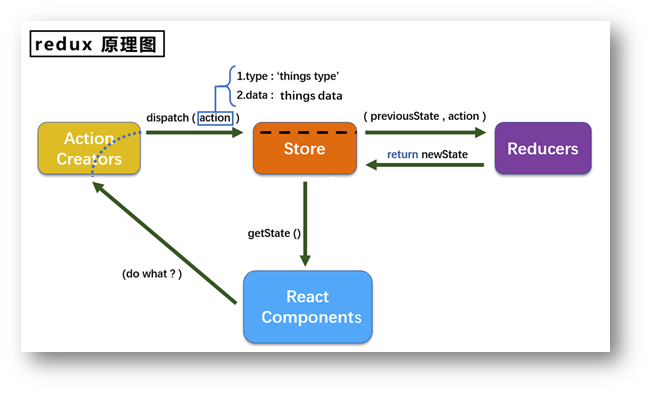
由上图可以看出redux主要由三个核心部份组成,action, store, reducers
action
动作的对象,其中包含了两个属性
- type 标识属性,值为字符串,唯一必要属性
- data 数据属性,值类型随意,可选属性
例如:{ type: xxx, data: {name: xxx, age: xxx} }
reducer
- 主要用于初始化状态,加工状态
- 加工时,根据旧的state和action,产生新的state的纯函数
store
- 将state,action,reducer联系在一起的对象
- 引入store中的 createStore 创建 store对象
- 引入自己创建的reducer文件
- 将引入的reducer文件通过createStore暴露出去
//引入creatStore。用于创建redux中的核心对象store
import { createStore } from 'redux'
//引入为Count组件服务的reducer
import countReducer from './reducer'
//暴露
export default createStore(countReducer);
该对象通过getState() 得到state。通过dispatch(action) 分发action,触发reducer,产生新的state。subscribe(listener) 注册监听,当产生了新的state就会调用更新状态。
这三个核心对象关系就类似餐厅里面上菜的模式,组件作为客人,action作为服务员记录点的菜,reducer作为后厨厨师,store为老板。
案例展示
求和案例
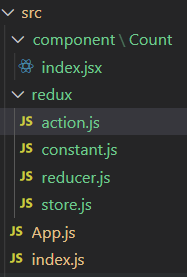
文夹目录如上。首先写好需要用的组件count效果如下: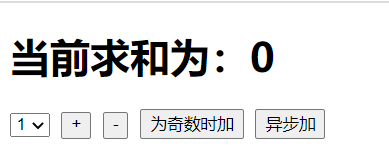
创建redux目录,目录里创建action,reducer,store,constant js文件
constant.js文件
/*
  该模块用于定义action对象中type类型的常量,便于管理,防止写错
*/
export const INCREMENT = 'increment';
export const DECREMENT = 'decrement';
reducer.js文件
/*
   1. 该文件是用于创建一个为count服务的reducer,reducer的本质就是一个函数
   2. reducer函数会接收到两个参数,分别为之前的状态(preState),动作对象(action)
*/
import {INCREMENT, DECREMENT} from './constant'
const initState = 0;//设置默认值
export default function reducer(preState = initState, action) {
  //获取type,data
  const { type, data } = action;
  switch (type) {
    case INCREMENT:
      return preState + data;
    case DECREMENT:
      return preState - data;
    default:
      return preState;
  }
}
action.js文件
/*
   该文件专门为count组件生成action对象
*/
import {INCREMENT, DECREMENT} from './constant'
export const createIncrementAction = (data)  => ({type:INCREMENT, data});
export const createDecrementAction = (data)  => ({type:DECREMENT, data});
store.js文件
//引入creatStore。用于创建redux中的核心对象store
import { createStore } from 'redux'
//引入为Count组件服务的reducer
import countReducer from './reducer'
//暴露
export default createStore(countReducer);
组件中的使用
import React, { Component } from 'react'
import store from '../../redux/store'//引入store
import {createDecrementAction, createIncrementAction} from '../../redux/action'
export default class Count extends Component {
state = {}
increment = () => {
const { value } = this.selectNum;
store.dispatch(createIncrementAction(+value));
}
decrement = () => {
const { value } = this.selectNum;
store.dispatch(createDecrementAction(+value));
}
incrementOfOdd = () => {
const { value } = this.selectNum;
if (store.getState() % 2 !== 0) {
store.dispatch(createIncrementAction(+value));
}
}
asyncIncrement = () => {
const { value } = this.selectNum;
setTimeout(() => {
store.dispatch(createIncrementAction(+value));
}, 500);
}
render() {
return (
<div>
<h1>当前求和为:{store.getState()}</h1>
<select ref={(c) => { this.selectNum = c; }}>
<option value="1">1</option>
<option value="2">2</option>
<option value="3">3</option>
</select>
<button onClick={this.increment}>+</button>
<button onClick={this.decrement}>-</button>
<button onClick={this.incrementOfOdd}>为奇数时加</button>
<button onClick={this.asyncIncrement}>异步加</button>
</div>
)
}
}最后在index.js中引入store.subscribe(),监听变化更新
import React from 'react';
import ReactDOM from 'react-dom';
import App from './App';
import store from './redux/store'
ReactDOM.render(
  <React.StrictMode>
    <App />
  </React.StrictMode>,
  document.getElementById('root')
);
store.subscribe(() => {
  ReactDOM.render(
    <React.StrictMode>
      <App />
    </React.StrictMode>,
    document.getElementById('root')
  );
});
2、redux 的异步编程
redux默认是不支持异步编程的,要实现异步编程的话就需要异步中间件,下载如下插件
npm install --save redux-thunk在使用最基本的redux写的求和案例中,我们实现异步始在组件中通过setTimeout函数实现的,所以我们要把异步的实现也写在redux中
首先接着上面写好的案例:
我们在action添加一个异步加的函数
/*
   该文件专门为count组件生成action对象
*/
import { INCREMENT, DECREMENT } from './constant'
export const createIncrementAction = data => ({ type: INCREMENT, data });
export const createDecrementAction = data => ({ type: DECREMENT, data });
//所谓的异步action就是指的是action的值为函数,同步的action的值就是object一般对象
//异步action一般都是调用同步action
export const createIncrementAsyncAction = (data, time) => {
   return (dispatch) => {
      setTimeout(() => {
         dispatch(createIncrementAction(data));
      }, time);
   }
}
store.js修改
//引入creatStore。用于创建redux中的核心对象store
import { createStore, applyMiddleware } from 'redux'
//引入redux-thunk,用以支持异步action
import thunk from 'redux-thunk'
//引入为Count组件服务的reducer
import countReducer from './reducer'
//暴露
export default createStore(countReducer, applyMiddleware(thunk));
这时在组件中通过 dispatch 调用 createIncrementAsyncAction就可以实现异步操作了
3、react-redux基本使用
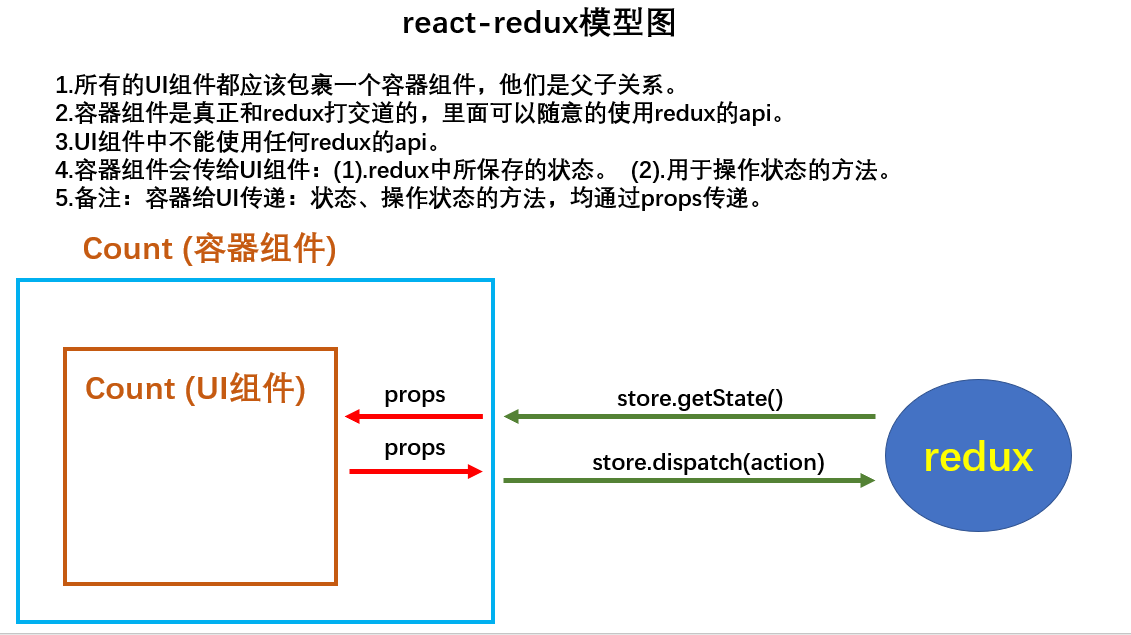
react-redux可以理解为一个用来简化react中使用redux的使用
react-redux将组件分为两个大类
UI组件
- 只负责页面ui呈现,不带有任何的逻辑业务
- 通过props接收数据(一般数据和函数数据)
- 不使用任何redux的API
- 一般保存在components文件下
容器组件
- 负责管理数据和业务逻辑
- 使用redux的api
- 一般保存在containers下
常用API
- Provider 让所有组件都可以得到state数据
- connect 包装 UI 组件生成容器组件
- mapStateToprops 将外部的state对象转化为ui组件的标签属性
- maDispatchToProps 将分发的action的函数转化为ui组件的标签属性
接着上述异步redux的案例我们改成react-redux的使用方式
- 下载react-redux
npm install --save react-reduxredux文件不变创建与component目录同级的containers,在里面创建一个Count组件作为component中Count的容器组件
//引入Count的ui组件
import CountUI from '../../component/Count'
//引入connect用于连接ui组件和redux
import { connect } from 'react-redux'
import {
  createDecrementAction,
  createIncrementAction,
  createIncrementAsyncAction
} from '../../redux/action'

//函数的返回值作为状态传递给组件作为组件props中的key,value
function mapStateToProps(state) {//这里的状态已经传进去了,只需要一个参数接收
  return { count: state }
}

//返回的对象中的value就是操作方法
function mapDispatchToProps(dispatch) {
  return {
    increment: data => dispatch(createIncrementAction(data)),
    decrement: data => dispatch(createDecrementAction(data)),
    asyncIncrement: (data, time) => dispatch(createIncrementAsyncAction(data, time))
  }
}

//使用connect创建并暴露一个Count的容器组件
export default connect(mapStateToProps, mapDispatchToProps)(CountUI);
在app组件中引入容器组件,同时通过props方式传递我们配置store对象
import React, { Component } from 'react'
import store from './redux/store'
import Count from './containers/Count'
export default class componentName extends Component {
  render() {
    return (
      <div>
        <Count store={store} />
      </div>
    )
  }
}
ui组件使用props方式得到数据更改数据
import React, { Component } from 'react' export default class Count extends Component { state = {} increment = () => { const { value } = this.selectNum; this.props.increment(+value); } decrement = () => { const { value } = this.selectNum; this.props.decrement(+value); } incrementOfOdd = () => { const { value } = this.selectNum; if (this.props.count % 2 !== 0) { this.props.increment(+value); } } asyncIncrement = () => { const { value } = this.selectNum; this.props.asyncIncrement(+value, 500); } render() { console.log(this.props) return ( <div> <h1>当前求和为:{this.props.count}</h1> <select ref={(c) => { this.selectNum = c; }}> <option value="1">1</option> <option value="2">2</option> <option value="3">3</option> </select> <button onClick={this.increment}>+</button> <button onClick={this.decrement}>-</button> <button onClick={this.incrementOfOdd}>为奇数时加</button> <button onClick={this.asyncIncrement}>异步加</button> </div> ) } }依赖注入
react-redux可以自动监听state变化所以不用在index.js 中使用store.subscribe() 监听了,另外我们之前在app中将store传给Count容器组件,这里我们在index.js中使用依赖注入的方式进行传递import React from 'react'; import ReactDOM from 'react-dom'; import App from './App'; import store from './redux/store' import {Provider} from 'react-redux'//依赖注入,使得所有的容器组件都有store了 ReactDOM.render( <React.StrictMode> <Provider store={store}> <App /> </Provider> </React.StrictMode>, document.getElementById('root') ); //react-redux可以自动检测了状态变化了,不用自己写检测状态了
4、redux数据共享优化版
优化
上面我们使用react-redux的时候,UI组件和容器是分开写的,而容器组件又需要单独引入UI组件,所以我们第一个优化的就是直接将ui组件放在容器组件中
import React, { Component } from 'react'
//引入connect用于连接ui组件和redux
import { connect } from 'react-redux'
import {
createDecrementAction,
createIncrementAction,
createIncrementAsyncAction
} from '../../redux/action'
//ui组件
class Count extends Component {
state = {}
increment = () => {
const { value } = this.selectNum;
this.props.increment(+value);
}
decrement = () => {
const { value } = this.selectNum;
this.props.decrement(+value);
}
incrementOfOdd = () => {
const { value } = this.selectNum;
if(this.props.count % 2 !== 0){
this.props.increment(+value);
}
}
asyncIncrement = () => {
const { value } = this.selectNum;
this.props.asyncIncrement(+value, 500);
}
render() {
return (
<div>
<h1>当前求和为:{this.props.count}</h1>
<select ref={(c) => { this.selectNum = c; }}>
<option value="1">1</option>
<option value="2">2</option>
<option value="3">3</option>
</select>
<button onClick={this.increment}>+</button>
<button onClick={this.decrement}>-</button>
<button onClick={this.incrementOfOdd}>为奇数时加</button>
<button onClick={this.asyncIncrement}>异步加</button>
</div>
)
}
}
//使用connect创建并暴露一个Count的容器组件
export default connect(
state => ({ count: state }),
//mapDispatchToProps一般写法
/* dispatch => ({
increment: data => dispatch(createIncrementAction(data)),
decrement: data => dispatch(createDecrementAction(data)),
asyncIncrement: (data, time) => dispatch(createIncrementAsyncAction(data, time))
}) */
//mapDispatchToProps简写,所以可以用一个函数,也可以用一个对象
{
increment: createIncrementAction,
decrement: createDecrementAction,
asyncIncrement: createIncrementAsyncAction
}
)(Count);数据共享
我们再创建一个Person组件来实现redux的共享功能
另外我们把redux中的action和reducer分下类,新建actions和reducers目录,目录结构如下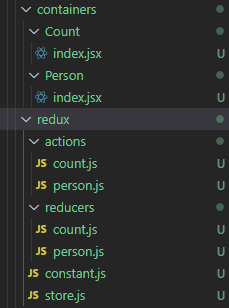
这里分别创建count和person的action和reducer,以后各个组件的redux都这样建立文件夹
Count.jsx
import React, { Component } from 'react'
//引入connect用于连接ui组件和redux
import { connect } from 'react-redux'
import {
createDecrementAction,
createIncrementAction,
createIncrementAsyncAction
} from '../../redux/action'
//ui组件
class Count extends Component {
state = {}
increment = () => {
const { value } = this.selectNum;
this.props.increment(+value);
}
decrement = () => {
const { value } = this.selectNum;
this.props.decrement(+value);
}
incrementOfOdd = () => {
const { value } = this.selectNum;
if(this.props.count % 2 !== 0){
this.props.increment(+value);
}
}
asyncIncrement = () => {
const { value } = this.selectNum;
this.props.asyncIncrement(+value, 500);
}
render() {
return (
<div>
<h1>当前求和为:{this.props.count}</h1>
<select ref={(c) => { this.selectNum = c; }}>
<option value="1">1</option>
<option value="2">2</option>
<option value="3">3</option>
</select>
<button onClick={this.increment}>+</button>
<button onClick={this.decrement}>-</button>
<button onClick={this.incrementOfOdd}>为奇数时加</button>
<button onClick={this.asyncIncrement}>异步加</button>
</div>
)
}
}
//使用connect创建并暴露一个Count的容器组件
export default connect(
state => ({ count: state }),
//mapDispatchToProps一般写法
/* dispatch => ({
increment: data => dispatch(createIncrementAction(data)),
decrement: data => dispatch(createDecrementAction(data)),
asyncIncrement: (data, time) => dispatch(createIncrementAsyncAction(data, time))
}) */
//mapDispatchToProps简写,所以可以用一个函数,也可以用一个对象
{
increment: createIncrementAction,
decrement: createDecrementAction,
asyncIncrement: createIncrementAsyncAction
}
)(Count);Person.jsx
import React, { Component } from 'react'
import { connect } from 'react-redux'
import { nanoid } from 'nanoid'
import { addPersonAction } from '../../redux/actions/person'
//ui组件
class Person extends Component {
addList = () => {
const name = this.nameNode.value;
const age = this.ageNode.value;
const personObj = { id: nanoid(), name, age }
this.props.addList(personObj);
}
render() {
return (
<div>
<h2>我是Person组件,上方的count为:{this.props.count}</h2>
<input ref={c => this.nameNode = c} type="text" placeholder="输入名字" />
<input ref={c => this.ageNode = c} type="text" placeholder="输入年龄" />
<button onClick={this.addList} >添加</button>
<ul>
{
this.props.person.map((item) => {
return (
<li key={item.id}>{item.name}, {item.age}</li>
)
})
}
</ul>
</div>
)
}
}
//容器组件
export default connect(
state => ({ person: state.personReducer, count: state.countReducer }),
{
addList: addPersonAction
}
)(Person)要想组件共享props的话store就要将两个组件的reducer组合起来
store.js
//引入creatStore。用于创建redux中的核心对象store
import { createStore, applyMiddleware, combineReducers } from 'redux'
//引入redux-thunk,用以支持异步action
import thunk from 'redux-thunk'
//引入为Count组件服务的reducer
import countReducer from './reducers/count'
import personReducer from './reducers/person'
//组合reducer
const allReducer = combineReducers({
  countReducer,
  personReducer
});

//暴露
export default createStore(allReducer, applyMiddleware(thunk));
注意合并后的总状态是一个对象!!!
5、react-redux开发者工具的使用
下载
npm i redux-devtools-extension -D在store中配置
//引入creatStore。用于创建redux中的核心对象store
import { createStore, applyMiddleware, combineReducers } from 'redux'
//引入redux-thunk,用以支持异步action
import thunk from 'redux-thunk'
//引入redux开发者工具
import { composeWithDevTools } from 'redux-devtools-extension'
//引入为Count组件服务的reducer
import countReducer from './reducers/count'
import personReducer from './reducers/person'
const allReducer = combineReducers({
  countReducer,
  personReducer
});

//暴露,要是我们没用中间件这个参数就直接将composeWithDevTools(),作为第二个参数,否者就将中间件函数放在composeWithDevTools中作为参数
export default createStore(allReducer, composeWithDevTools(applyMiddleware(thunk)));
总结
- 所有变量名字要规范,尽量触发对象的简写形式。
- reducers文件夹中,编写index.js专门用于汇总并暴露所有的reducer

Comment here is closed