Redux的使用
纯函数
函数式编程中有一个概念就是纯函数,JS中也有这个概念。在React中,纯函数的概念非常重要。
定义:如果一个函数满足以下条件就可以称之为纯函数。
- 此函数在相同的输入值时,需产生相同的输出。函数的输出和输入值以外的其他隐藏信息或状态无关,也和由I/O设备产生的外部输出无关。就是输入值相同的时候,你无论调用该函数多少次输出的值都是一样的。
- 该函数不依赖使用全局变量,常量是可以的。
- 不会修改程序的状态,或者不能引起副作用。即不能影响输出值以外的内容。
案例:
//纯函数
function (a, b) {
    return a+b;
}

//不是纯函数,当然你可以把let改为const那就称之为纯函数了,因为foo成为常量了,是无法被修改的
let foo = 1;
function (a) {
    return foo+a;
}
总之纯函数的出现是为了时函数不那么复杂,更容易调试和组合。
React中之所以要求函数组件或class组件都要想纯函数一样是为了保护props不被修改。
Redux概念
目前使用JS开发的程序已经越来越复杂了,所以我们需要管理的状态也越来越多和复杂。我们在加入了组件化开发模式后需要对每个组件的状态进行合理的管理,有时还需涉及状态共享。所以为了更好的管理这些状态,我们可以使用redux这个状态管理库来管理我们的状态。
Redux就是一个帮助我们管理State的容器:Redux是JavaScript的状态容器,提供了可预测的状态管理,使得状态更加可控和追踪。
Redux并不依赖与React,还可以和Vue一同使用,本身体积很小(2kb左右)。
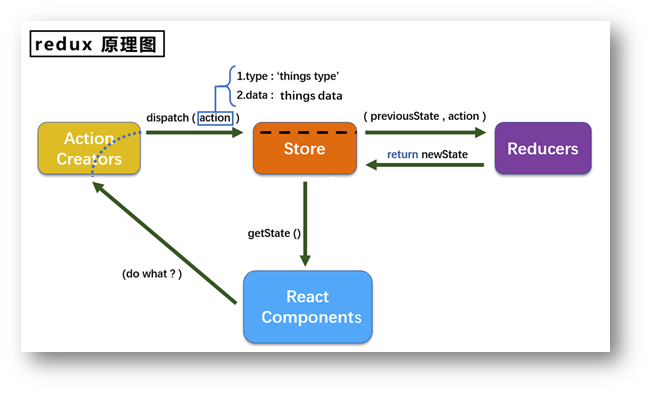
首先看看React的工作原理:
由上图可以看出Redux主要由三个核心部份组成action, store, reducer。
核心概念之store
该模块是把state和action和reducer联系起来,引入reducer文件然后向外暴露store对象。我们可以通过store获得state和派发action。
核心概念之action
Redux要求所有修改数据的操作都要通过action来派发,action一般是一个JS对象,用来描述此次更新的type和content。
核心概念之reducer
该模块就是将state和action联系起来,reducer就是一个纯函数,用于接收action来生成新的state。
简单案例展示,单独使用redux
//导入redux
const redux = require("redux");
//初始state
const initialState = {
  counter: 0,
};

//创建一个reducer
function reducer(state = initialState, action) {
  switch (action.type) {
    case "INCREMENT":
      return { ...state, counter: state.counter + 1 };
    case "DECREMENT":
      return { ...state, counter: state.counter - 1 };
    case "ADD_NUM":
      return { ...state, counter: state.counter + action.num };
    case "SUB_NUM":
      return { ...state, counter: state.counter - action.num };
    default:
      return state;
  }
}

//store
const store = redux.createStore(reducer);

//action
const action1 = { type: "INCREMENT" };
const action2 = { type: "DECREMENT" };
const action3 = { type: "ADD_NUM", num: 5 };
const action4 = { type: "SUB_NUM", num: 12 };

//订阅store修改
store.subscribe(() => {
  console.log('state发送了改变');
  console.log(store.getState());
})


//派发action
store.dispatch(action1);
store.dispatch(action2);
store.dispatch(action3);
store.dispatch(action4);
输出结果展示:
state发送了改变
{ counter: 1 }
state发送了改变
{ counter: 0 }
state发送了改变
{ counter: 5 }
state发送了改变
{ counter: -7 }
Redux的三大原则
单一数据源
- 整个应用的
state应该只存在一个store中 - 尽量只创建一个
store,便于管理,虽然可以创建多个。 - 单一数据源对状态的追踪,修改,维护。
state是只读的
- 不能直接修改
state的值,我们只能根据旧的state来返回新的state。 - 唯一修改
state的方法就是通过派发action。 - 保证所有的修改都被集中化处理,并且按照严格的顺序来执行,所以不需要担心
race condition(竞态)的问题。
使用纯函数来修改
- 通过
reducer将 旧state和action联系在一起,并且返回一个新的state。 - 所有的
reducer都应该是纯函数,不能产生任何的副作用。
Redux结合React使用
在实际开发中我们管理的状态是很多的,所以我们需要将React的模块分开管理,也可以按照状态的种类进行分类。
首先我们定义一个store文件夹,这里就存放redux相关的模块文件。
然后创建action.js index.js reducer.js constant.js这四个文件夹,当然可以根据自己喜好命名
我们还是演示一个求和案例:action.js
import { ADD_NUM, SUB_NUM } from "./constant.mjs";

export const action1 = (num) => ({
  type: ADD_NUM,
  num,
});

export const action2 = (num) => ({
  type: SUB_NUM,
  num,
});
constant.js
//对action的类别名进行常量化,方便管理
export const ADD_NUM = 'ADD_NUM';
export const SUB_NUM = 'SUB_NUM';
reducer.js
import { ADD_NUM, SUB_NUM } from "./constant.mjs";

const defaultState = {
  counter: 0,
};

export const reducer = (state = defaultState, action) => {
  switch (action.type) {
    case ADD_NUM:
      return { ...state, counter: state.counter + action.num };
    case SUB_NUM:
      return { ...state, counter: state.counter - action.num };
    default:
      return state;
  }
};
index.js
import redux from "redux";
import { reducer } from "./reducer.mjs";

const store = redux.createStore(reducer);

export default store;
这里我定义两个了两个组件:
home.js
import React, { PureComponent } from "react";
//引入store和action
import store from "../redux-test/test分模块/index.mjs";
import { action1, action2 } from "../redux-test/test分模块/action.mjs";

export default class home extends PureComponent {
  state = {
    counter: store.getState().counter,
  };
  render() {
    return (
      <div>
        <hr />
        <h1>Home</h1>
        <h2>当前计数{this.state.counter}</h2>
        <button
          onClick={() => {
            this.addNum();
          }}
        >
          +
        </button>
        <button
          onClick={() => {
            this.subNum();
          }}
        >
          -
        </button>
      </div>
    );
  }
  componentDidMount() {
    //监听state改变
    this.unSubscribe = store.subscribe(() => {
      this.setState({
        counter: store.getState().counter,
      });
    });
  }
//取消订阅
  componentWillUnmount() {
    this.unSubscribe();
  }
  //派发action
  addNum() {
    store.dispatch(action1(1));
  }
  subNum() {
    store.dispatch(action2(2));
  }
}
about.js
//和home是一样的,主要展示state的共享
import React, { PureComponent } from "react";

import store from "../redux-test/test分模块/index.mjs";
import { action1, action2 } from "../redux-test/test分模块/action.mjs";

export default class About extends PureComponent {
  state = {
    counter: store.getState().counter,
  };
  render() {
    return (
      <div>
        <h1>About</h1>
        <h2>当前计数{this.state.counter}</h2>
        <button
          onClick={() => {
            this.addNum();
          }}
        >
          +
        </button>
        <button
          onClick={() => {
            this.subNum();
          }}
        >
          -
        </button>
      </div>
    );
  }
  componentDidMount() {
    this.unSubscribe = store.subscribe(() => {
      this.setState({
        counter: store.getState().counter,
      });
    });
  }
  componentWillUnmount() {
    this.unSubscribe();
  }

  addNum() {
    store.dispatch(action1(1));
  }
  subNum() {
    store.dispatch(action2(2));
  }
}
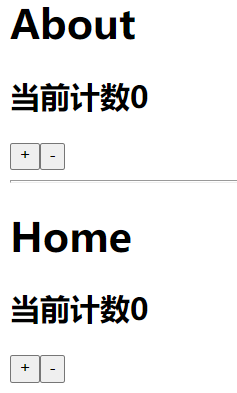
效果如下:
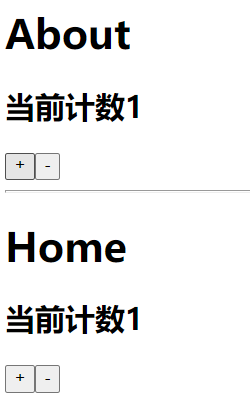
点击一次按钮后:
我们现在就简单的演示了rearedux结合react的使用,但是这样使用还有很多的缺点。比如,两个文件都需要引入store,同时都要编写监听state改变的订阅函数(当然解决方式之一是将订阅函数写在index.js中监听根app组件)。可以看到两个组件都编写了很多重复代码。
connect函数
为了解决上面出现的问题,我们现在编写一个函数来对代码进行抽取。
//利用高阶函数来传递state中的数据和action,增强生命周期
import { PureComponent } from "react";
import store from "../redux-test/test分模块/index.js";

//自行封装一个connect函数
export default function connect(mapStateToProps, mapDispatchToProps) {
  return function enhanceHOC(WrappedComponent) {
    return class extends PureComponent {
      constructor(props) {
        super(props);
        this.state = {
          storeState: mapStateToProps(store.getState()),
        };
      }
      //订阅更新组件
      componentDidMount() {
        this.unsubscribe = store.subscribe(() => {
          this.setState({
            storeState: mapStateToProps(store.getState()),
          });
        });
      }
      //取消订阅
      componentWillUnmount() {
        this.unsubscribe();
      }
      render() {
        return (
          <WrappedComponent
            {...this.props}
            {...mapStateToProps(store.getState())}
            {...mapDispatchToProps(store.dispatch)}
          />
        );
      }
    };
  };
}
组件中使用:
import React, { PureComponent } from "react";

import { action1, action2 } from "../redux-test/test分模块/action.js";
import connect from "../utils/connect";
function About(props) {
  return (
    <div>
      <h1>About</h1>
      <h2>当前计数{props.counter}</h2>
      <button
        onClick={() => {
          props.action1(5);
        }}
      >
        +
      </button>
      <button
        onClick={() => {
          props.action2(2);
        }}
      >
        -
      </button>
    </div>
  );
}

//需要定义这两个
const mapStateToProps = (state) => {
  return {
    counter: state.counter,
  };
};

const mapDispatchToProps = (dispatch) => {
  return {
    action1: (num) => {
      dispatch(action1(num));
    },
    action2: (num) => {
      dispatch(action2(num));
    },
  };
};
export default connect(mapStateToProps, mapDispatchToProps)(About);相当于通过这个函数将获取state和派发action的方式放置到组件的props中,同时检测订阅state更新的函数以高阶函数方式集成进来。
但是我们注意这个connect函数是依赖于store,如果我们想把它作为一个单独的库来封装的话是不够独立的。所以我们可以想办法将store以context方式传递给组件。
另外创建一个文件context.js
import React from 'react';

const StoreContext = React.createContext();
export {
  StoreContext
}在index.js中导入
import React from "react";
import ReactDOM from "react-dom";
import App from "./App";
import store from "./redux-test/test分模块/index.js";
import { StoreContext } from "./utils/context";

ReactDOM.render(
  <React.StrictMode>
    <StoreContext.Provider value={store}>
      <App />
    </StoreContext.Provider>
  </React.StrictMode>,
  document.getElementById("root")
);改进后的connect.js
import { PureComponent } from "react";
//这里需要引入store,所以不够独立,不能作为一个库文件使用,所以我们要换一种方式来获取store
//import store from "../redux-test/test分模块/index.mjs";

import { StoreContext } from "../utils/context";

//自行封装一个connect函数
export default function connect(mapStateToProps, mapDispatchToProps) {
  return function enhanceHOC(WrappedComponent) {
    return class extends PureComponent {
      constructor(props, context) {
        //在构造函数中要使用参数中context,不能直接使用this.context,现在还获取不到
        super(props);
        this.state = {
          storeState: mapStateToProps(context.getState()),
        };
      }
      //获取context
      static contextType = StoreContext;
      //订阅更新组件
      componentDidMount() {
        this.unsubscribe = this.context.subscribe(() => {
          this.setState({
            storeState: mapStateToProps(this.context.getState()),
          });
        });
      }
      //取消订阅
      componentWillUnmount() {
        this.unsubscribe();
      }
      render() {
        return (
          <WrappedComponent
            {...this.props}
            {...mapStateToProps(this.context.getState())}
            {...mapDispatchToProps(this.context.dispatch)}
          />
        );
      }
    };
  };
}
React-redux
通过上述操作我们简化了在组件中操作store中state的步骤,但实际上React为我们提供了一个库叫做react-redux
我们实现的connect就是大致还原了这个库的基本用处。当然这个库肯定功能逻辑都比自己书写的更加全面和缜密。
安装方式:
//npm
npm install react-redux
//yarn
yarn add react-redux
使用方式:
import React, { PureComponent } from "react";

import {
  action1,
  action2,
  action3,
  action4,
} from "../redux-test/test分模块/action.js";
//引入官方的connect函数
import { connect } from "react-redux";
import axios from "axios";

class home extends PureComponent {
  render() {
    return (
      <div>
        <hr />
        <h1>Home</h1>
        <h2>当前计数{this.props.counter}</h2>
        <button
          onClick={() => {
            this.props.action1(2);
          }}
        >
          +
        </button>
        <button
          onClick={() => {
            this.props.action2(1);
          }}
        >
          -
        </button>
      </div>
    );
  }
  componentDidMount() {
    axios.get("http://123.207.32.32:8000/home/multidata").then((res) => {
      const data = res.data.data;
      this.props.changeBanners(data.banner.list);
      this.props.changeRecommends(data.recommend.list);
    });
  }
}

const mapStateToProps = (state) => ({
  counter: state.counter,
  banners: state.banners,
  recommends: state.recommends,
});
const mapDispatchToProps = (dispatch) => ({
  action1: (num) => dispatch(action1(num)),
  action2: (num) => dispatch(action2(num)),
  changeBanners(banners) {
    dispatch(action3(banners));
  },
  changeRecommends(recommends) {
    dispatch(action4(recommends));
  },
});
export default connect(mapStateToProps, mapDispatchToProps)(home);
import React from "react";
import ReactDOM from "react-dom";
import App from "./App";
import store from "./redux-test/test分模块/index.js";
//提供了Provider组件来代替context方式
import { Provider } from "react-redux";
ReactDOM.render(
<React.StrictMode>
<Provider store={store}>
<App />
</Provider>
</React.StrictMode>,
document.getElementById("root")
);
React中的异步操作
我们通过store保存的state数据还可能通过网络请求获取,所以就会设计到异步操作,我们虽然可以将异步操作写在组件中,但是这会使得代码不容易管理当然也不够优雅,而且网络请求的数据也是redux的一部分,所以我们推荐将异步步骤也写在redux中进行管理。
以下是设计好的加上异步任务的redux流程图

实际上就是需要一个中间件来扩展action到renducer这之间的代码。
React-thunk
官方推荐的处理异步请求的中间件就是使用react-thunk
安装方式:
//npm
npm install react-thunk
//yarn
yarn add react-thunk
使用方式:
在导入store的index.js文件中添加中间件
import { createStore, applyMiddleware } from "redux";
import thunk from "redux-thunk";
import { reducer } from "./reducer.js";

const store = createStore(reducer, applyMiddleware(thunk));

export default store;这时候我们的action就可以返回一个函数了
//redux-thunk中定义函数,同步的action返回对象,异步的返回一个函数
export const getHomeMultidataAction = () => {
    //返回的函数会接受两个参数一个为dispatch,另一个为state
  return (dispatch, getState) => {
    axios.get("http://xxx").then((res) => {
      const data = res.data.data;
      //getState获取state中数据
      console.log(getState());
      //调用dispatch保存数据
      dispatch(action3(data.banner.list));
      dispatch(action4(data.recommend.list));
    });
  };
};
组件中使用:
//组件中使用,这里省略了部分组件代码
const mapDispatchToProps = (dispatch) => ({
  action1: (num) => dispatch(action1(num)),
  action2: (num) => dispatch(action2(num)),
  getHomeMultidata() {
    dispatch(getHomeMultidataAction());
  },
});
redux-saga
//todo
redux-devtools
官网还提供了一个调试工具方便我们跟踪state的状态。通过这个工具我们就可以知道state更改前后的状态还有如何更改的,而且还有回放功能。
使用方式一:
结合中间件使用
第一步,在浏览器中安装Redux DevTools,这个安装方式就自己找了
第二步,在redux中集成中间件
import { createStore, applyMiddleware, compose } from "redux";
import thunk from "redux-thunk";
import { reducer } from "./reducer.js";

//引入redux-dev-tool,要开启trace功能就需要配置
const composeEnhancers =
  window.__REDUX_DEVTOOLS_EXTENSION_COMPOSE__({
    trace: true,
  }) || compose;
const store = createStore(reducer, composeEnhancers(applyMiddleware(thunk)));

export default store;
之后就可以愉快的 调试了。
使用方式二:
结合npm插件使用,当然前提还是要浏览器安装redux-devtool
需要安装一个npm包
//npm
npm i redux-devtools-extension -D
//yarn
yarn add redux-devtools-extension在store中配置:
import { createStore, applyMiddleware, compose } from "redux";
import thunk from "redux-thunk";
import { reducer } from "./reducer.js";
import {composeWithDevTools} from 'redux-devtools-extension'
//没有中间件就直接使用composeWithDevTools()即可
const store = createStore(reducer, composeWithDevTools(applyMiddleware(thunk)));

export default store;
当然详细用法链接
关于中间件的一些知识补充
我们现在有个需求,希望每次dispatch都能打印当前action,然后dispatch后打印最新的state
以下的代码为例:
//导入redux
const redux = require("redux");

const initialState = {
  counter: 0,
};

//创建一个reducer
function reducer(state = initialState, action) {
  switch (action.type) {
    case "INCREMENT":
      return { ...state, counter: state.counter + 1 };
    case "DECREMENT":
      return { ...state, counter: state.counter - 1 };
    case "ADD_NUM":
      return { ...state, counter: state.counter + action.num };
    case "SUB_NUM":
      return { ...state, counter: state.counter - action.num };
    default:
      return state;
  }
}

const store = redux.createStore(reducer);

const action1 = { type: "INCREMENT" };
const action2 = { type: "DECREMENT" };

const action3 = { type: "ADD_NUM", num: 5 };
const action4 = { type: "SUB_NUM", num: 12 };

//订阅store修改
store.subscribe(() => {
  console.log('state发送了改变');
  console.log(store.getState());
})

//修改dispatch

//打印日志
function patchLogging(store) {
  const next = store.dispatch;
  store.dispatch = function (action) {
    console.log("更改前action", action);
    next(action);
    console.log("更改后:", store.getState());
  };
}

//模拟thunk中间件
function thunk(store) {
  const next = store.dispatch;

  store.dispatch = function (action) {
    if (typeof action === "function") {
      action(store.dispatch, store.getState);
    } else {
      next(action);
    }
  };
}
patchLogging(store);
thunk(store);


//派发action
function bar(dispatch, state) {
  console.log(state());
  dispatch(action2);
}

//派发action
store.dispatch(action1);
//模拟thunk中间件
store.dispatch(bar)
结果:
更改前action { type: 'INCREMENT' }
state改变
{ counter: 1 }
更改后: { counter: 1 }
{ counter: 1 }
更改前action { type: 'DECREMENT' }
state改变
{ counter: 0 }
更改后: { counter: 0 }上述代码处理大致展示了中间件的一种实现,以及演示了redux-thunk的简单实现。
但是如果有大量的中间件,我们一个一个执行未必有点繁琐,所以我们需要合并中间件执行。
//封装一个函数来实现所有中间件的合并执行
function middeleware(store, ...middelewares){
  middelewares.forEach((midlewareItem) => {
    midlewareItem(store);
  })
}
middeleware(store, patchLogging, thunk)以上只是简单了解中间件,可以看到实现过程是非常的灵活,更详细的实现可以参阅redux合并中间件的源码流程。
reducer合并
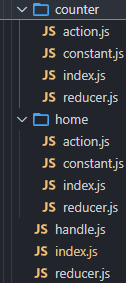
在项目管理状态比较庞大的时候我们可能需要将state分成多个模块进行管理,比如目录如下:
redux可能会涉及多个模块,这时候就有多个reducer,我们需要将reducer合并处理。
import { reducer as homeReducer } from "./home";
import { reducer as counterReducer } from "./counter";

export const reducer = (state = {}, action) => {
  return {
    counterInfo: counterReducer(state.counterInfo, action),
    homeInfo: homeReducer(state.homeInfo, action),
  };
};上述是自定义的一个合并reducer的函数。redux内部是提供了一个函数的combineReducers。
官方实现:
import { reducer as homeReducer } from "./home";
import { reducer as counterReducer } from "./counter";
import { combineReducers } from "redux";
export const reducer = combineReducers({
  counterInfo: counterReducer,
  homeInfo: homeReducer,
});该函数将我们传入的reducers合并到一个对象中,最终返回一个combination的函数(相当于我们之前的reducer函数了),在执行combination函数的过程中,它会通过判断前后返回的数据是否相同来决定返回之前的state还是新的state, 新的state会触发订阅者发生对应的刷新,而旧的state可以有效的组织订阅者发生刷新。
redux中hook的使用
在组件中我们要使用redux中保存的数据需要通过connect来进行联系,另外还需要编写mapStateToProps和mapDispatchToProps。如果我们有大量的代码需要引入redux,那写这些函数将感到繁琐,所以我们可以使用react-redux内置的一些hook来代替这些方法。
使用方式:
import { useDispatch, useSelector, shallowEqual } from 'react-redux';const { xxxstate } = useSelector(
(state) => ({
xxxstate: state.recommend.topBanners
}),
shallowEqual
);
const dispatch = useDispatch();
//执行dispatch
dispatch(xxxACtion())上述两行代码就可以使用redux的代码和dispatch了,但是使用hook是有一定的问题。
虽然我们使用redux hook可以简化代码而且也可以不使用connect,但是redux-hook有性能问题,connect内部是做了优化的,会对前后的state进行比较来确定依赖的组件是否需要更新。而useSelector只是对传入的函数进行执行,然后对返回的结果进行比较,而每次执行函数返回的都是新的一个对象。当然解决方案也很简单,导入react-redux中的一个函数shallowEqual,作为useSelector的第三个参数。
